For Java projects the findings of Sonargraph can be stored and visualized in SonarQube using the SonarQube Sonargraph Integration Plugin. The plugin is available via the SonarQube update center and on the plugin's GitHub page at https://github.com/sonargraph/sonar-sonargraph-integration/releases. The plugin is compatible with SonarQube versions 5.3 and higher.
NOTE
The plugin reads the information of the XML report that has been generated using SonargraphBuild. You need to configure your build pipeline accordingly.
NOTE
The number of reported Sonargraph issues might be different in SonarQube for the following reasons: As far as we know, SonarQube requires a physical resource to attach an issue. There is no equivalent SonarQube resource for "logical" Sonargraph elements like "logical namespaces", so there are no SonarQube issues created for package cycles, for example. If you want to track package cycles, configure relevant metrics like "Number of cyclic packages", "Biggest Package Cycle Group", etc. to be shown in a dashboard widget or make them part of your Quality Gate.
On the other hand an individual SonarQube issue is attached to the source file of each duplicate code block occurrence of a Sonargraph duplicate code issue. The same applies to all source files involved in Sonargraph component cycle groups.
Our recommendation: Use SonarQube only as a reporting dashboard and use Sonargraph Architect/Explorer for detailed analysis. The usability and interactions for Sonargraph issues is much better in the rich-client application!
NOTE
The plugin is currently only available for Java systems.
The following list describes the necessary steps to get Sonargraph issues and metrics integrated in SonarQube. Additional details are given below.
-
Download the latest SonarQube LTS version. SonarQube's API changes fast, so we don't guarantee that everything works flawless with the latest and greatest SonarQube version. If you spot a problem, please let us know!
-
Download the latest Sonargraph plugin and copy it into <sonarqube-inst>/extensions/plugins (or use the Update Center, once it is available there).
-
Start the SonarQube server.
-
Change the current quality profile or create a new one that include at least one of the "Sonargraph Integration" rules. Assign your project to this profile. Details about SonarQube Quality Profiles can be found here: https://docs.sonarqube.org/display/SONAR/Quality+Profiles
If no Sonargraph rules are activated, the plugin will skip this project. You can either search for rules using the term "Sonargraph Integration", or the tag "sonargraph-integration".
-
Change the dashboard configuration to include the "Sonargraph Integration" widgets (for details, see below). NOTE: Project dashboards have been dropped since SonarQube version 6.1.
-
For the full functionality of Sonargraph, you need an "Architect" license. If you don't have one, just register on our hello2morrow web site and request a trial license. Alternatively, use a free Sonargraph Explorer license with reduced feature set (no architecture checks, no scripts execution, etc.)
-
Configure your build to run SonargraphBuild prior to the SonarQube scanner. Check the previous chapters for details and don't forget to configure the "prepareForSonarQube" flag!
The Sonargraph SonarQube Plugin repository at https://github.com/sonargraph/sonar-sonargraph-integration contains an example multi-module Maven project in src/test/AlarmClockMain. There are various build files and batch files available that demonstrate how the analysis can be executed.
-
Execute the build and check in the console log that the Sonargraph Integration plugin has been executed. In SonarQube the Sonargraph Integration widgets should now display metrics determined by Sonargraph and if your projects contains architecture violations or cyclic dependencies, these should be visible as issues.
Configure your dashboard widgets to show relevant Sonargraph metrics. The Quality Gate can be adjusted to contain those metrics as well.
-
If you have difficulties setting up the integration, check the console log first for any errors reported by the SonargraphBuild execution or the Sonargraph SonarQube Plugin.
If your system is really big and contains a lot of modules, check the info below about how to "Handling Large Systems".
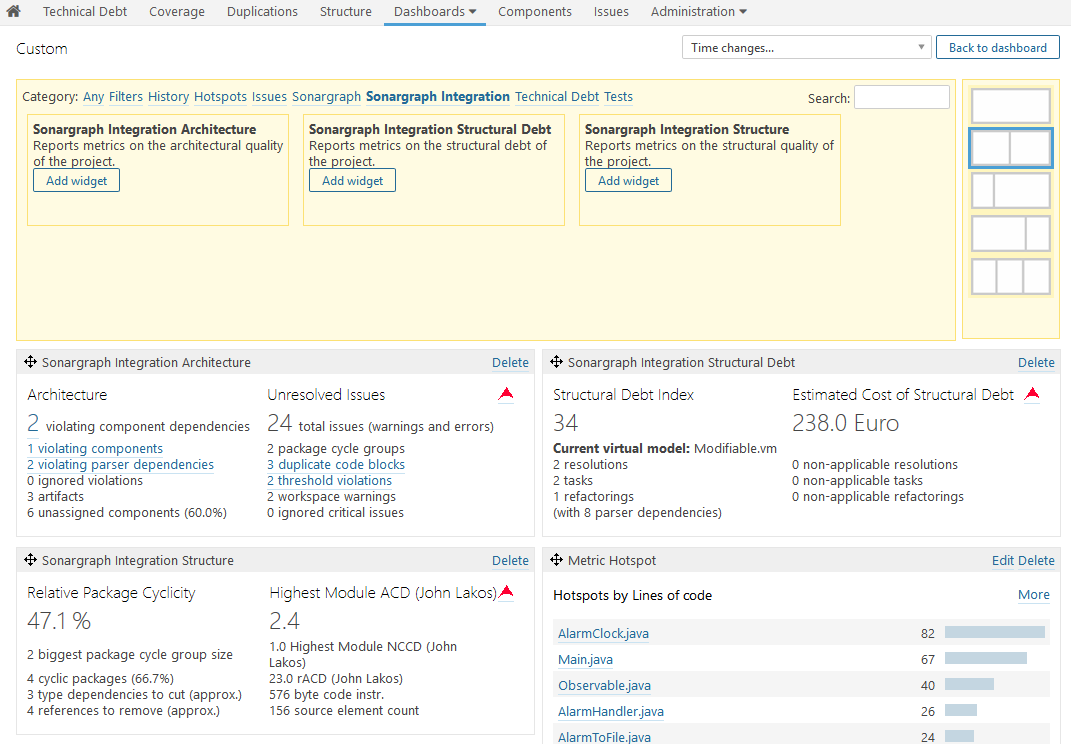
Configuration of Dashboard Widgets
The following screenshot shows the available Sonargraph widgets that can be included in your SonarQube dashboard.
NOTE
The Sonargraph widgets are no longer available for SonarQube versions 6.1 and newer, since SonarQube project dashboards have been dropped.
Include Custom Sonargraph Metrics and Issues
Core metrics and rules of Sonargraph are pre-defined in the plugin. If you want to track custom metrics that are generated via scripts, you first need to export the report meta-data via the standalone application's menu → . The directory of this meta-data file needs to be specified in the plugin's configuration page. The additional metrics will be available after a restart of the SonarQube server and an additional execution of the SonarQube checks.
NOTE
This configuration is affecting all projects that use the Sonargraph plugin. If you have several projects with different metrics, store the separate meta-data files in the same directory. The plugin will merge the info of the different configuration files.
Related topics:
-
See the section about "Workspace Profiles" in the user manual of the standalone application, if the root directories on your build server do not match the workspace definition.
If you use the SonarQube Maven plugin, you must set the following parameter in the configuration of the SonargraphBuild Maven plugin in your project's pom.xml:
<configuration>
    <prepareForSonarQube>true</prepareForSonarQube>
    ...
</configuration>
The SonargraphBuild Maven plugin will automatically create an XML report (if not already configured) and will copy the report to ${target}/sonargraph/sonargraph-sonarqube-report.xml for the root project and all modules (excluding those with packaging "pom").
The example project contains an example pom.xml and also a batch file that demonstrates how the check can be called from the command-line.
Related topics:
NOTE
For very large systems with a high number of modules, do not use the prepareForSonarQube flag. This causes the generated report to be copied into each project's target folder.
Instead, use the parameters to specify the report format ("xml"), the report's target directory and file name and use the parameter "sonar.sonargraph_integration.report.path" as explained in Section 9.5, “SonarQube Scanner / Ant Runner Configuration”. This causes the same report instance to be re-used for every module being analyzed by SonarQube.
An example command-line with the aforementioned parameters (added line-breaks for readability):
mvn clean package
   sonargraph:create-report -Dsonargraph.reportFormat=xml
    -Dsonargraph.reportDirectory=D:/temp/report -Dsonargraph.reportFileName=MyReport
   sonar:sonar -Dsonar.sonargraph_integration.report.path=D:/temp/report/MyReport.xml
If you use the SonarQube Gradle plugin, you must set the following parameter in the configuration of the SonargraphBuild tasks in your project's build.gradle:
sonargraphReport
{
    activationCode = "36E2-0F3E-643F-B4F2"
    prepareForSonarQube = "true"
}
The SonargraphBuild Gradle plugin will automatically create an XML report (if not already configured) and will copy the report to ${target}/sonargraph/sonargraph-sonarqube-report.xml for the root project and all modules.
Related topics:
If you use the SonarQube Ant Runner the Sonargraph XML report must have been created and this report must be configured for the Sonargraph SonarQube plugin using the following parameter:
<property name="sonar.sonargraph_integration.report.path" value="${path.target.report}" />The example project contains this configuration in the Ant build file.
Related topics:
